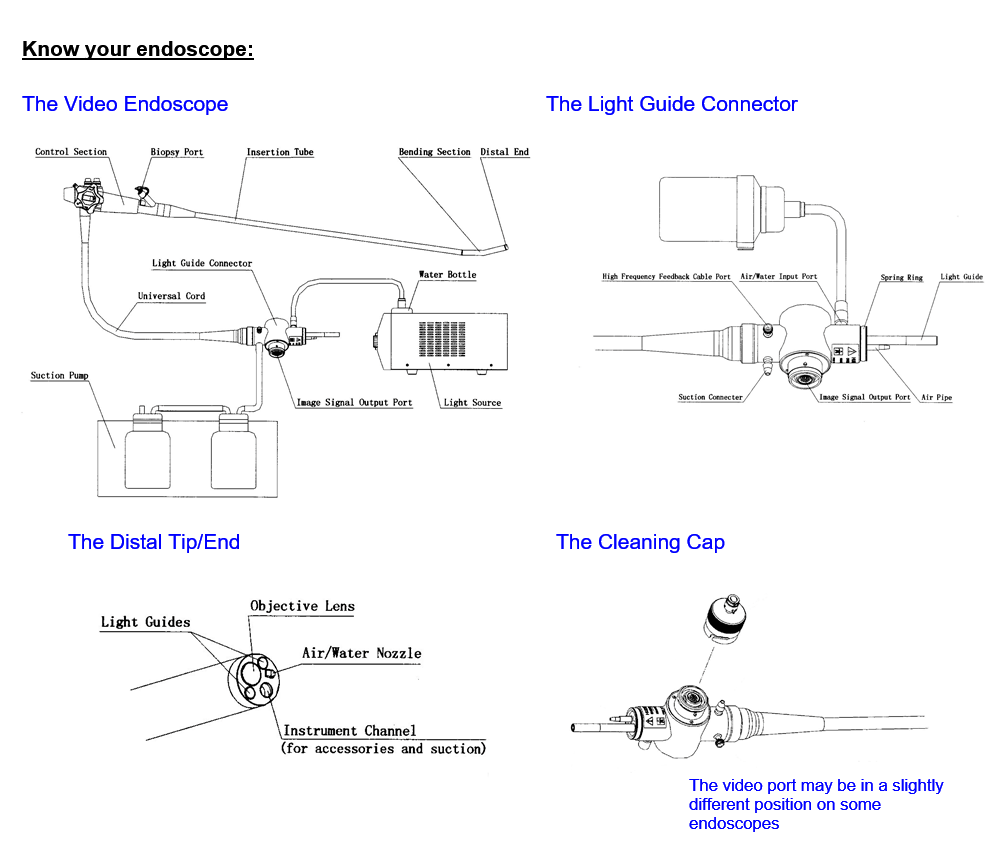
Your videoscope may be of a different design but most parts are similar
CLEANING & STERILISING YOUR ENDOSCOPES
A short Video to help you with the written information below

Just click on the icon above
Before you start cleaning:
Immediately after you have used the endoscope and before you disengage it from your system:
- Whilst still connected to the VIDEO PROCESSOR/LIGHT SOURCE, flush through air/water channels by pressing the blue button repeatedly for about 10 seconds to spray water through the jet at the distal tip to clear any debris.
- Remove the endoscope from the light source and wipe all bio debris from the body and tubes with a sterilising wipe tissue.
- Use a table top to lay out the scope and inspect its patient tube & umbilical for cuts and grazes, particularly the bending rubber section and its seals… ensure the distal tip is complete, not damaged & ensure the glass light fibre lenses are not cracked or missing.
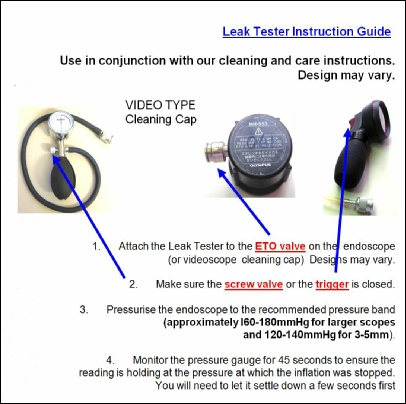
- Dry leak test the endoscope. Attach the CLEANING CAP – pump it up to 140 – 180 pressure (12 O’clock position on some dials) and monitor it for 30 seconds, that’s long enough to see any major pressure drop on the dial. Leave the CLEANING CAP ON
If the scope fails testing, STOP, wipe/sterilise (do not immerse in fluids) and call me!
NOTE: the leak tester itself is not waterproof. Keep it out of any cleaning fluids or it will fail. I recommend that you leave the tester attached but kept out of fluids.
IMPORTANT: Ensure you always release pressure slowly at the end of completing the scope cleaning process using the tester valve then remove the CLEANING CAP as you hang up the scope for storage.
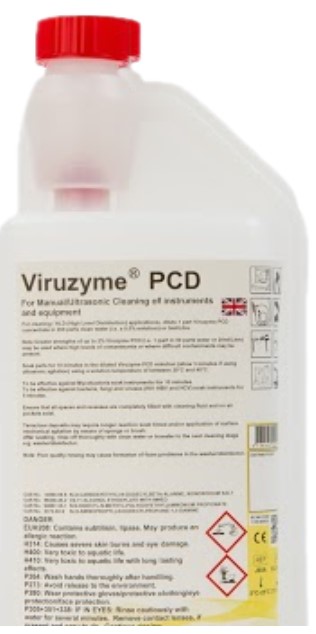
The VIRUZYME PCD* Cleaning & Disinfection Procedure
- VIRUZYME PCD is a new ‘All In One’ cleaner and steriliser product. No need to use separate cleaner & sterilising solutions. This helps save cost and time. It has a 7 day life once mixed so you might want to save it in a tray or bottle.
- Have ready 2 large shallow trays such as a ‘Very Useful Box’ Model: 33ASSCOL (or use two side by side sinks) One filled sufficiently to cover the entire endoscope with clean room temperature water, the other with your premix of VIRUZYME PCD – ALWAYS CHECK THE MANUFACTURERS RECOMMENDED SOLUTION MIX
- After dry leak testing the endoscope and having carried out pre-checks above:
- Using the first tray/sink, filled sufficiently with room temperature water to cover the entire endoscope place the inflated scope into the water with the leak test head hanging over the side away from fluids. Use a cleaning brush to agitate the endoscope’s main body surfaces to remove any trapped air. (Remove the two valves and the biopsy cap and then take them through the same cleaning regime) Inspect the endoscope – look for ‘Champagne bubbles’ or constant ‘blips’ of air. If you see anything – STOP – wipe clean the scope and call me.
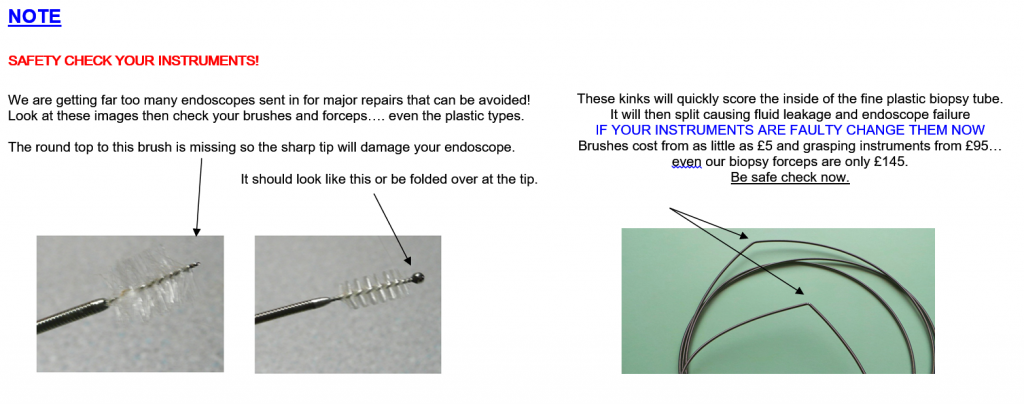
- Drain then move the scope to the second tray/sink, filled sufficiently with the VIRUZYME PCD solution – place the inflated scope into this fluid. ( usually mixed 5ml VIRUZYME PCD to 1 litre water & and fluid temperature range 20-40C) Use a long biopsy channel brush through the instrument/biopsy channel two or three times to clear internal debris. Brush all the external surfaces paying particular attention to the angulation controls and the distal tip water nozzle and lenses.
- Attach the FLUSHING KIT to the endoscope. (See diagram on page 9) Once attached, use a syringe to thoroughly flush the endoscope with VIRUZYME PCD then leave the endoscope to soak for the recommended period of time NO LONGER.
- While the endoscope and buttons are sterilising empty the first tray/sink, clean it with detergent and refill it with clean room temperature water ready for rinsing the endoscope. After the recommended time soaking in steriliser remove the endoscope and drain it as much as possible then place it in the rinsing water (check scope pressure is still OK) Remove the rubber flushing kit cap from the biopsy channel port and thoroughly brush through the scope again. Now reattach the rubber biopsy flushing kit cap and use the syringe to rinse through the endoscope. Now brush the outside of the scope to ensure all the steriliser is removed from surfaces.
- When finished lift out the endoscope, drain it and place it on a table top previously covered in paper towels. Use the now empty syringe and flushing kit still attached to the endoscope to pump air through the channels to remove as much residual water as possible. Hang the endoscope on its wall bracket – place paper towels under it on the floor to catch any drips. Place the two buttons and the rubber biopsy cap in a cloth bag and hang it around the angulation knobs. Don’t use plastic bags and NEVER leave the buttons/cap in the endoscope during storage as the scope needs to aerate.
- Dry the exterior of the endoscope with clean paper towels.… then…
STORAGE
Store the endoscope on a proper endoscope wall hanger with the buttons and biopsy cap REMOVED. Release the leak tester trigger or valve to depressurise the scope. If it’s a videoscope you can now remove the CLEANING CAP as long as the scope is dry and no fluids are still draining out.
Buttons and biopsy cap – keep these in a separate cloth bag on a hook. Clean all rubber cleaning bulbs, syringes etc ready for next time. A good place to leave them is in the empty rinsing tray.
Use medical grade silicon oil once a month on the rubber seals of water buttons, water bottle connectors and leak tester caps to keep the rubber from becoming brittle and leaky.
Using the ENDOTECH Cleaning Kit